In this tutorial, Today I will explain to how to add custom mass action to the customer grid in Magento 2. In Magento 2 admin, the customer grid created by ui_component. There are some mass actions already available in Magento 2 customer grid. But, if you want to add custom mass action to the customer grid then, you need to extend customer_listing.xml file.
Let’s follow the below steps to add custom mass action to the customer grid.
You may also like this :
1) First of all, Let’s assume that you have a simple module. Now, create customer_listing.xml file at app/code/RH/Helloworld/view/adminhtml/ui_component/ and paste the below code :
[dm_code_snippet background=”no” background-mobile=”no” slim=”no” line-numbers=”no” bg-color=”#fff” theme=”dark” language=”markup” wrapped=”no” height=”” copy-text=”Copy Code” copy-confirmed=”Copied”]
<?xml version="1.0" encoding="UTF-8"?>
<!--
/**
 * Created By : Rohan Hapani
 */
-->
<listing xmlns:xsi="http://www.w3.org/2001/XMLSchema-instance" xsi:noNamespaceSchemaLocation="urn:magento:module:Magento_Ui:etc/ui_configuration.xsd">
    <listingToolbar name="listing_top">
        <massaction name="listing_massaction">
            <action name="gender_customer">
                <settings>
                    <type>gender_customer</type>
                    <label translate="true">Update Gender</label>
                    <actions>
                        <action name="0">
                            <type>female</type>
                            <label translate="true">Female</label>
                            <url path="helloworld/index/massGender">
                                <param name="gender">2</param>
                            </url>
                        </action>
                        <action name="1">
                            <type>male</type>
                            <label translate="true">Male</label>
                            <url path="helloworld/index/massGender">
                                <param name="gender">1</param>
                            </url>
                        </action>
                    </actions>
                </settings>
            </action>
        </massaction>
    </listingToolbar>
</listing>
[/dm_code_snippet]
2) After that, Create MassGender.php file at app/code/RH/Helloworld/Controller/Adminhtml/Index/ and paste the below code to update the value :
[dm_code_snippet background=”no” background-mobile=”no” slim=”no” line-numbers=”no” bg-color=”#abb8c3″ theme=”dark” language=”php” wrapped=”no” height=”” copy-text=”Copy Code” copy-confirmed=”Copied”]
<?php
/**
 * Created By : Rohan Hapani
 */
namespace RH\Helloworld\Controller\Adminhtml\Index;

use Magento\Backend\App\Action;
use Magento\Backend\App\Action\Context;
use Magento\Framework\Controller\ResultFactory;
use Magento\Ui\Component\MassAction\Filter;
use Magento\Customer\Api\CustomerRepositoryInterface;
use Magento\Customer\Model\ResourceModel\Customer\CollectionFactory;

class MassGender extends Action
{

    /**
     * @var Filter
     */
    protected $filter;

    /**
     * @var CustomerRepositoryInterface
     */
    protected $customerRepository;

    /**
     * @var CollectionFactory
     */
    protected $customerFactory;

    public function __construct(
        Context $context,
        Filter $filter,
        CustomerRepositoryInterface $customerRepository,
        CollectionFactory $customerFactory
    ) {
        $this->filter = $filter;
        $this->customerRepository = $customerRepository;
        $this->customerFactory = $customerFactory;
        parent::__construct($context);
    }

    /**
     * Execute action
     *
     * @return \Magento\Backend\Model\View\Result\Redirect
     * @throws \Magento\Framework\Exception\LocalizedException | \Exception
     */
    public function execute()
    {
        $gender = $this->getRequest()->getParam('gender');
        $collection = $this->filter->getCollection($this->customerFactory->create());
        foreach ($collection->getAllIds() as $customerId) {
            $customerObj = $this->customerRepository->getById($customerId);
            $customerObj->setData('gender',$gender);
            $this->customerRepository->save($customerObj);
        }
        $this->messageManager->addSuccess(__('A total of %1 record(s) have been modified.', $collection->getSize()));
        /** @var \Magento\Backend\Model\View\Result\Redirect $resultRedirect */
        $resultRedirect = $this->resultFactory->create(ResultFactory::TYPE_REDIRECT);
        return $resultRedirect->setPath('customer/index/index');
    }
}
[/dm_code_snippet]
That’s it !!!
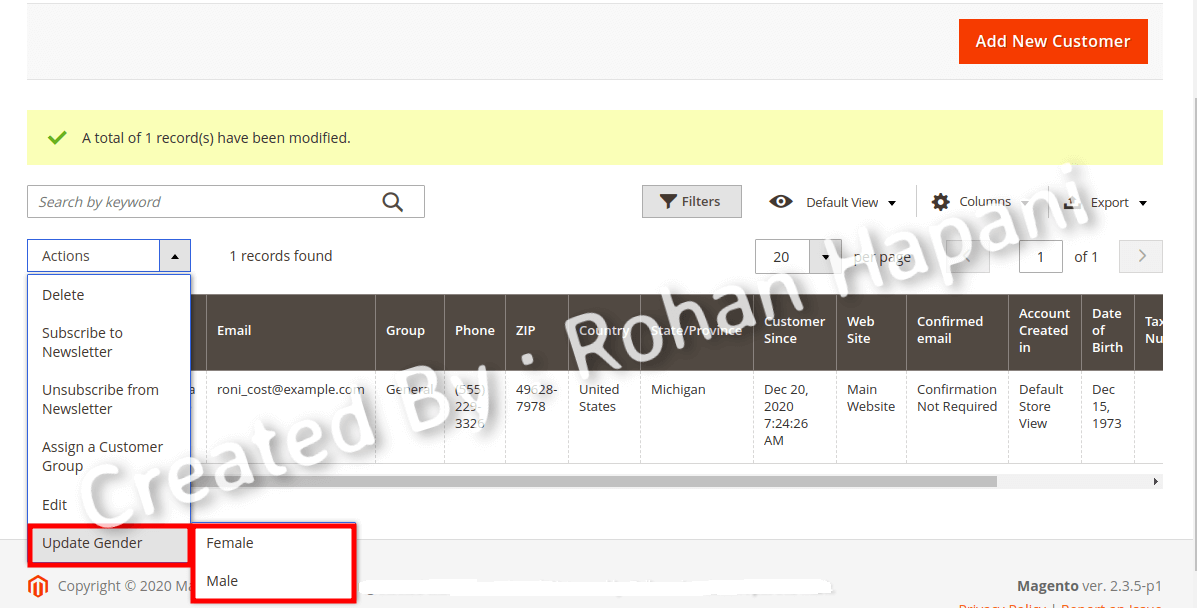
Now, you can set the value male/female of “Gender” field value in the customer grid. You can set your custom action based on your requirement.
Output :
I hope this blog is easy to understand about how to add custom mass action to the customer grid in Magento 2. In case, I missed anything or need to add some information, always feel free to leave a comment in this blog, I’ll get back with proper solution.
Stay Safe and Stay Connected !!