In this tutorial, Today I will explain to how to add custom top link in Magento 2 PWA. Magento 2 PWA venia theme provide some menus items in top links. But, You want to add custom top links then, you need to customize some points to add custom top links.
You may also like this :
- Magento 2.3 PWA Installation Guide
- How to Add Custom Font in Magento 2 PWA
- How to Create Custom Router in Magento 2 PWA
Let’s follow some below steps for that.
- Magento root directory = {baseUrl} = /var/www/html/m242
1) First of all, You need to override file using webpack plugin. Open {baseUrl}/pwa-studio/packages/venia-concept/webpack.config.js and find this below code to add plugin file code :
[dm_code_snippet background=”no” background-mobile=”no” slim=”no” line-numbers=”no” bg-color=”#fff” theme=”dark” language=”javascript” wrapped=”no” height=”” copy-text=”Copy Code” copy-confirmed=”Copied”]
const {
    configureWebpack,
    graphQL: {
        getMediaURL,
        getStoreConfigData,
        getAvailableStoresConfigData,
        getPossibleTypes
    }
} = require('@magento/pwa-buildpack');
const {
    DefinePlugin
} = require('webpack');
const HTMLWebpackPlugin = require('html-webpack-plugin');

module.exports = async env => {
    /**
     * configureWebpack() returns a regular Webpack configuration object.
     * You can customize the build by mutating the object here, as in
     * this example. Since it's a regular Webpack configuration, the object
     * supports the `module.noParse` option in Webpack, documented here:
     * https://webpack.js.org/configuration/module/#modulenoparse
     */
    const config = await configureWebpack({
        context: __dirname,
        vendor: [
            '@apollo/client',
            'apollo-cache-persist',
            'informed',
            'react',
            'react-dom',
            'react-feather',
            'react-redux',
            'react-router-dom',
            'redux',
            'redux-actions',
            'redux-thunk'
        ],
        special: {
            'react-feather': {
                esModules: true
            }
        },
        env
    });

    const mediaUrl = await getMediaURL();
    const storeConfigData = await getStoreConfigData();
    const {
        availableStores
    } = await getAvailableStoresConfigData();

    /**
     * Loop the available stores when there is provided STORE_VIEW_CODE
     * in the .env file, because should set the store name from the
     * given store code instead of the default one.
     */
    const availableStore = availableStores.find(
        ({
            code
        }) => code === process.env.STORE_VIEW_CODE
    );

    global.MAGENTO_MEDIA_BACKEND_URL = mediaUrl;
    global.LOCALE = storeConfigData.locale.replace('_', '-');
    global.AVAILABLE_STORE_VIEWS = availableStores;

    const possibleTypes = await getPossibleTypes();

    config.module.noParse = [
        /@adobe\/adobe\-client\-data\-layer/,
        /braintree\-web\-drop\-in/
    ];
    config.plugins = [
        ...config.plugins,
        new DefinePlugin({
            /**
             * Make sure to add the same constants to
             * the globals object in jest.config.js.
             */
            POSSIBLE_TYPES: JSON.stringify(possibleTypes),
            STORE_NAME: availableStore ?
                JSON.stringify(availableStore.store_name) :
                JSON.stringify(storeConfigData.store_name),
            STORE_VIEW_CODE: process.env.STORE_VIEW_CODE ?
                JSON.stringify(process.env.STORE_VIEW_CODE) :
                JSON.stringify(storeConfigData.code),
            AVAILABLE_STORE_VIEWS: JSON.stringify(availableStores),
            DEFAULT_LOCALE: JSON.stringify(global.LOCALE),
            DEFAULT_COUNTRY_CODE: JSON.stringify(
                process.env.DEFAULT_COUNTRY_CODE || 'US'
            )
        }),
        new HTMLWebpackPlugin({
            filename: 'index.html',
            template: './template.html',
            minify: {
                collapseWhitespace: true,
                removeComments: true
            }
        })
    ];
    const path = require('path');
    /**
     * Plugin to override file/components
     */
    const NormalModuleOverridePlugin = require('./src/plugins/normalModuleOverrideWebpackPlugin');
    //const parentPackagePath = '@magento/venia-ui';
    const componentOverrideMapping = {
        ['@magento/peregrine/lib/talons/AccountMenu/useAccountMenuItems.js']: 'src/lib/talons/AccountMenu/useAccountMenuItems.js'
    };
    // Push the override plugin
    config.plugins.push(
        new NormalModuleOverridePlugin(componentOverrideMapping)
    );
    return config;
};
[/dm_code_snippet]
In the above file, this below code is used for override file :
[dm_code_snippet background=”no” background-mobile=”no” slim=”no” line-numbers=”no” bg-color=”#fff” theme=”dark” language=”javascript” wrapped=”no” height=”” copy-text=”Copy Code” copy-confirmed=”Copied”]
/**
     * Plugin to override file/components
     */
    const NormalModuleOverridePlugin = require('./src/plugins/normalModuleOverrideWebpackPlugin');
    //const parentPackagePath = '@magento/venia-ui';
    const componentOverrideMapping = {
        ['@magento/peregrine/lib/talons/AccountMenu/useAccountMenuItems.js']: 'src/lib/talons/AccountMenu/useAccountMenuItems.js'
    };
    // Push the override plugin
    config.plugins.push(
        new NormalModuleOverridePlugin(componentOverrideMapping)
    );
[/dm_code_snippet]
Here.
[dm_code_snippet background=”no” background-mobile=”no” slim=”no” line-numbers=”no” bg-color=”#fff” theme=”dark” language=”typescript” wrapped=”no” height=”” copy-text=”Copy Code” copy-confirmed=”Copied”]
@magento/peregrine/lib/talons/AccountMenu/useAccountMenuItems.js // Core JS file path
src/lib/talons/AccountMenu/useAccountMenuItems.js // override JS file path
[/dm_code_snippet]
2) Now, you need to create this folder {baseUrl}/pwa-studio/packages/venia-concept/src/lib/talons/AccountMenu/ and then, create useAccountMenuItems.js file and paste the below code :
[dm_code_snippet background=”no” background-mobile=”no” slim=”no” line-numbers=”no” bg-color=”#fff” theme=”dark” language=”javascript” wrapped=”no” height=”” copy-text=”Copy Code” copy-confirmed=”Copied”]
import { useCallback } from 'react';

/**
 * @param {Object}      props
 * @param {Function}    props.onSignOut - A function to call when sign out occurs.
 *
 * @returns {Object}    result
 * @returns {Function}  result.handleSignOut - The function to handle sign out actions.
 */
export const useAccountMenuItems = props => {
    const { onSignOut } = props;

    const handleSignOut = useCallback(() => {
        onSignOut();
    }, [onSignOut]);

    const MENU_ITEMS = [
        {
            name: 'Order History',
            id: 'accountMenu.orderHistoryLink',
            url: '/order-history'
        },
        {
            name: 'Favorites Lists',
            id: 'accountMenu.favoritesListsLink',
            url: '/wishlist'
        },
        {
            name: 'Address Book',
            id: 'accountMenu.addressBookLink',
            url: '/address-book'
        },
        {
            name: 'Saved Payments',
            id: 'accountMenu.savedPaymentsLink',
            url: '/saved-payments'
        },
        {
            name: 'Communications',
            id: 'accountMenu.communicationsLink',
            url: '/communications'
        },
        {
            name: 'Account Information',
            id: 'accountMenu.accountInfoLink',
            url: '/account-information'
        },
        {
            name: 'Custom Top Link',
            id: 'accountMenu.customtoplink',
            url: '/custom-link'
        }
    ];

    return {
        handleSignOut,
        menuItems: MENU_ITEMS
    };
};
[/dm_code_snippet]
Here, I added Custom Top Link as new top link.
[dm_code_snippet background=”no” background-mobile=”no” slim=”no” line-numbers=”no” bg-color=”#fff” theme=”dark” language=”javascript” wrapped=”no” height=”” copy-text=”Copy Code” copy-confirmed=”Copied”]
{
    name: 'Custom Top Link', // Link name
    id: 'accountMenu.customtoplink', // unique id of link
    url: '/custom-link' // Link URL
}
[/dm_code_snippet]
Now, You need to execute command from pwa root directory :
[dm_code_snippet background=”no” background-mobile=”no” slim=”no” line-numbers=”no” bg-color=”#fff” theme=”dark” language=”shell” wrapped=”no” height=”” copy-text=”Copy Code” copy-confirmed=”Copied”]
yarn run watch:venia
[/dm_code_snippet]
That’s it !!!
Output :
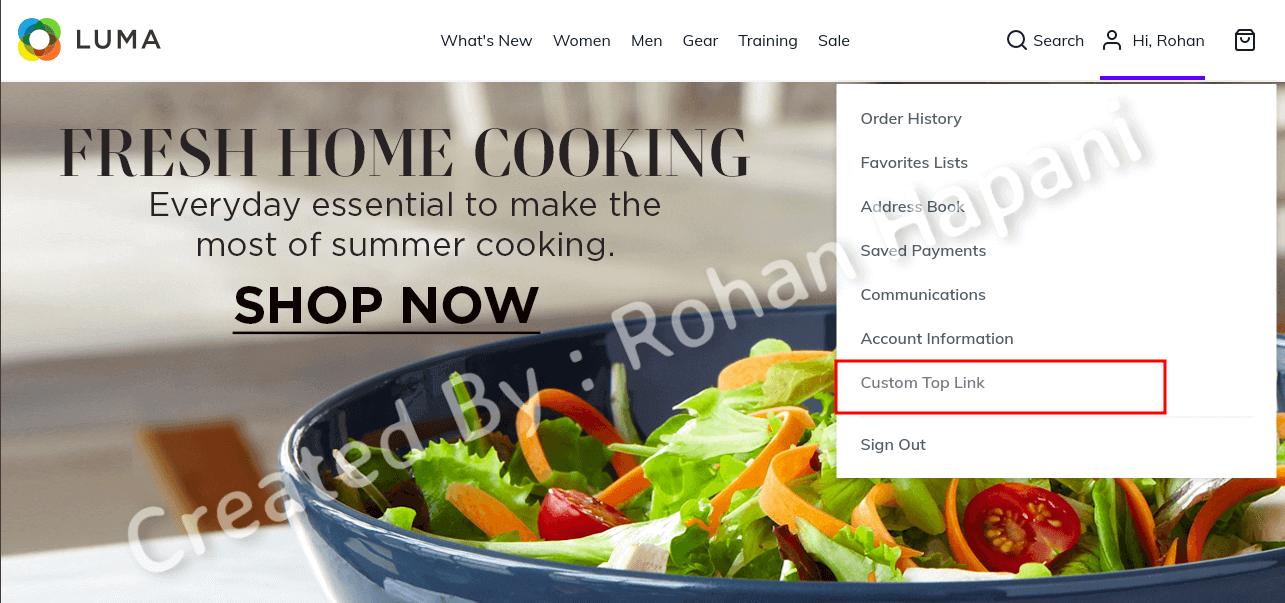
I hope this blog is easy to understand about how to add custom top link in Magento 2 PWA. In case, I missed anything or need to add some information, always feel free to leave a comment in this blog, I’ll get back with proper solution.
Stay Safe and Stay Connected !!