In this tutorial, Today I will explain to how to add image chooser in Magento 2 widget. In previous post, I have described that How to create custom widget in Magento 2. There are many types magento by default provided by Magento_Widget module. But, If you want to use image uploader then, you need to use block type in widget.
Let’s follow the below steps for add image uploader in widget
You may also like this :
1) First of all, You have created custom widget by above link. Then, You need to replace this below code in app/code/RH/Helloworld/etc/widget.xml file to define image uploader :
[dm_code_snippet background=”no” background-mobile=”no” slim=”no” line-numbers=”no” bg-color=”#fff” theme=”dark” language=”markup” wrapped=”no” height=”” copy-text=”Copy Code” copy-confirmed=”Copied”]
<?xml version="1.0" encoding="UTF-8"?>
<!--
/**
 * Created By : Rohan Hapani
 */
-->
<widgets xmlns:xsi="http://www.w3.org/2001/XMLSchema-instance"
    xsi:noNamespaceSchemaLocation="urn:magento:module:Magento_Widget:etc/widget.xsd">
    <widget id="rh_custom_widget" class="RH\Helloworld\Block\Widget\PageWidget">
        <label>RH Helloworld Custom Widget</label>
        <description>RH Helloworld Widget Example</description>
        <parameters>
            <parameter name="rh_title" xsi:type="text" visible="true" required="true">
                <label translate="true">RH Title</label>
            </parameter>
            <parameter name="rh_description" xsi:type="block" visible="true" required="true">
                <label translate="true">RH Description</label>
                <block class="RH\Helloworld\Block\Adminhtml\Widget\TextAreaField"/>
            </parameter>
            <!-- Image Uploader -->
            <parameter name="rh_image" xsi:type="block" visible="true" required="false">
                <label translate="true">RH Image Uploader</label>
                <block class="RH\Helloworld\Block\Adminhtml\Widget\ImageChooser">
                    <data>
                        <item name="button" xsi:type="array">
                            <item name="open" xsi:type="string">Choose Image...</item>
                        </item>
                    </data>
                </block>
            </parameter>
        </parameters>
   </widget>
</widgets>
[/dm_code_snippet]
2) To Add PageWidget.php file and it’s html follow this link for that : Click Here
3) After that, You need to create ImageChooser.php file at app/code/RH/Helloworld/Block/Adminhtml/Widget/ and paste the below code for create image uploader element.
[dm_code_snippet background=”no” background-mobile=”no” slim=”no” line-numbers=”no” bg-color=”#fff” theme=”dark” language=”php” wrapped=”no” height=”” copy-text=”Copy Code” copy-confirmed=”Copied”]
<?php
/**
 * Created By : Rohan Hapani
 */
namespace RH\Helloworld\Block\Adminhtml\Widget;

use Magento\Framework\Data\Form\Element\AbstractElement;

class ImageChooser extends \Magento\Backend\Block\Template
{
    /**
     * @var \Magento\Framework\Data\Form\Element\Factory
     */
    protected $elementFactory;

    /**
     * @param \Magento\Backend\Block\Template\Context $context
     * @param \Magento\Framework\Data\Form\Element\Factory $elementFactory
     * @param array $data
     */
    public function __construct(
        \Magento\Backend\Block\Template\Context $context,
        \Magento\Framework\Data\Form\Element\Factory $elementFactory,
        array $data = []
    ) {
        $this->elementFactory = $elementFactory;
        parent::__construct($context, $data);
    }
    /**
     * Prepare chooser element HTML
     *
     * @param \Magento\Framework\Data\Form\Element\AbstractElement $element Form Element
     * @return \Magento\Framework\Data\Form\Element\AbstractElement
     */
    public function prepareElementHtml(AbstractElement $element)
    {
        $config = $this->_getData('config');
        $sourceUrl = $this->getUrl('cms/wysiwyg_images/index',
            ['target_element_id' => $element->getId(), 'type' => 'file']);

        /** @var \Magento\Backend\Block\Widget\Button $chooser */
        $chooser = $this->getLayout()->createBlock(\Magento\Backend\Block\Widget\Button::class)
            ->setType('button')
            ->setClass('btn-chooser')
            ->setLabel($config['button']['open'])
            ->setOnClick('MediabrowserUtility.openDialog(\'' . $sourceUrl . '\', 0, 0, "MediaBrowser", {})')
            ->setDisabled($element->getReadonly());

        /** @var \Magento\Framework\Data\Form\Element\Text $input */
        $input = $this->elementFactory->create("text", ['data' => $element->getData()]);
        $input->setId($element->getId());
        $input->setForm($element->getForm());
        $input->setClass("widget-option input-text admin__control-text");
        if ($element->getRequired()) {
            $input->addClass('required-entry');
        }

        $element->setData('after_element_html', $input->getElementHtml() . $chooser->toHtml()
            . "<script>require(['mage/adminhtml/browser']);</script>");

        return $element;
    }
}
[/dm_code_snippet]
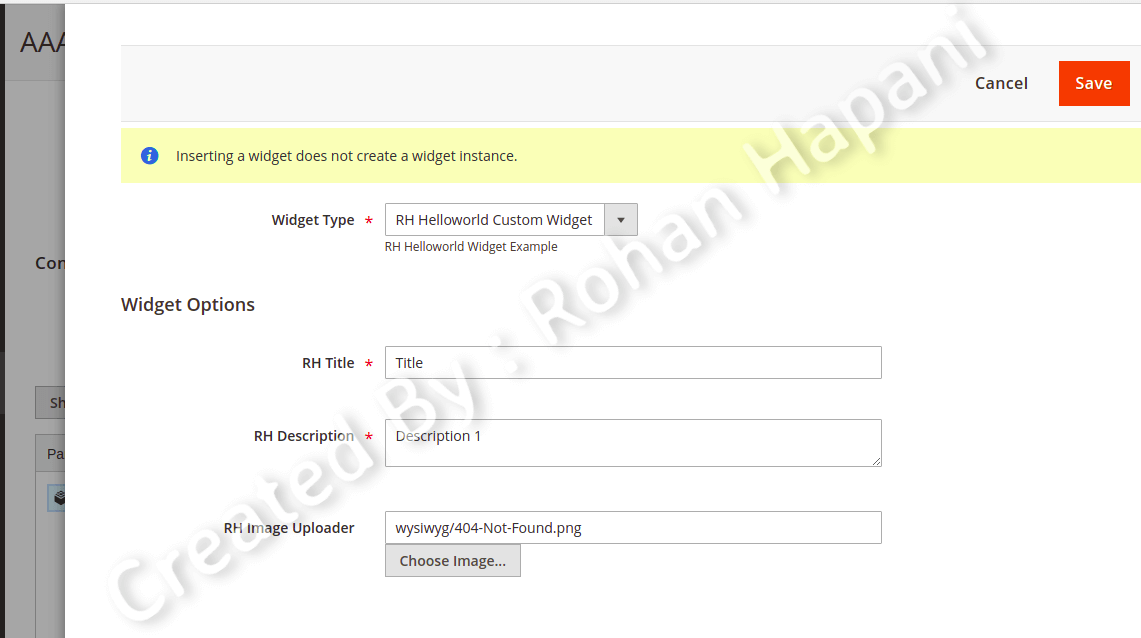
Image uploader added in widget successfully.
But, to solve image uploader file save issue which returned in the wysiwyg editor breaks, showing “}}
4) Create di.xml file at app/code/RH/Helloworld/etc/ and paste the below code :
[dm_code_snippet background=”no” background-mobile=”no” slim=”no” line-numbers=”no” bg-color=”#fff” theme=”dark” language=”markup” wrapped=”no” height=”” copy-text=”Copy Code” copy-confirmed=”Copied”]
<?xml version="1.0"?>
<!--
/**
 * Created By : Rohan Hapani
 */
-->
<config xmlns:xsi="http://www.w3.org/2001/XMLSchema-instance"
        xsi:noNamespaceSchemaLocation="urn:magento:framework:ObjectManager/etc/config.xsd">
    <type name="Magento\Widget\Model\Widget">
        <plugin name="image_uploader_solve" type="RH\Helloworld\Plugin\Widget" sortOrder="1"/>
    </type>
</config>
[/dm_code_snippet]
5) Create Widget.php at app/code/RH/Helloworld/Plugin/ and paste the below code :
[dm_code_snippet background=”no” background-mobile=”no” slim=”no” line-numbers=”no” bg-color=”#fff” theme=”dark” language=”php” wrapped=”no” height=”” copy-text=”Copy Code” copy-confirmed=”Copied”]
<?php
/**
 * Created By : Rohan Hapani
 */
namespace RH\Helloworld\Plugin;

class Widget
{
    /**
     * @var \Magento\Backend\Helper\Data
     */
    protected $backendData;

    /**
     * Widget constructor.
     *
     * @param \Magento\Backend\Helper\Data $backendData
     */
    public function __construct(
        \Magento\Backend\Helper\Data $backendData
    ) {
        $this->backendData = $backendData;
    }

    public function beforeGetWidgetDeclaration(
        \Magento\Widget\Model\Widget $subject,
        $type,
        $params = [],
        $asIs = true
    ) {
        foreach ($params as $name => $value) {
            if (preg_match('/(___directive\/)([a-zA-Z0-9,_-]+)/', $value, $matches)) {
                $directive = base64_decode(strtr($matches[2], '-_,', '+/='));
                $params[$name] = str_replace(['{{media url="', '"}}'], ['', ''], $directive);
            }
        }
        return [$type, $params, $asIs];
    }
}
[/dm_code_snippet]
Now, Just clean cache and check image uploader. You will save image successfully in widget.
Output (After Save Widget) :
I hope this blog is easy to understand about how to add image chooser in Magento 2 widget. In case, I missed anything or need to add some information, always feel free to leave a comment in this blog, I’ll get back with proper solution.
Stay Safe and Stay Connected !!