In this tutorial, Today I will explain to how to create custom widget in Magento 2. Widget is one of the good feature to add dynamic or static content to store pages and blocks. There are some by defaults widget Magento provided.
For ex :
- CMS Page Link
- CMS Static Block
- Catalog Products List
It’s also useful when you want to use functionality globally and reusable component with different parameteres. So, If you want to create custom widget then, you need to follow these below steps.
You may also like this :
Steps of Create Custom Widget in Magento 2 :
1) First of all, Create simple module. After that, Create widget.xml file at app/code/RH/Helloworld/etc/ folder and paste the below code :
[dm_code_snippet background=”no” background-mobile=”no” slim=”no” line-numbers=”no” bg-color=”#fff” theme=”dark” language=”markup” wrapped=”no” height=”” copy-text=”Copy Code” copy-confirmed=”Copied”]
<?xml version="1.0" encoding="UTF-8"?>
<!--
/**
 * Created By : Rohan Hapani
 */
-->
<widgets xmlns:xsi="http://www.w3.org/2001/XMLSchema-instance"
    xsi:noNamespaceSchemaLocation="urn:magento:module:Magento_Widget:etc/widget.xsd">
    <widget id="rh_custom_widget" class="RH\Helloworld\Block\Widget\PageWidget">
        <label>RH Helloworld Custom Widget</label>
        <description>RH Helloworld Widget Example</description>
        <parameters>
            <parameter name="rh_title" xsi:type="text" visible="true" required="true">
                <label translate="true">RH Title</label>
            </parameter>
            <parameter name="rh_description" xsi:type="block" visible="true" required="true">
                 <label translate="true">RH Description</label>
                 <block class="RH\Helloworld\Block\Adminhtml\Widget\TextAreaField"/>
            </parameter>
        </parameters>
   </widget>
</widgets>
[/dm_code_snippet]
Here in the widget,
- class = Widget class name.
- id = custom id of widget. It should be unique.
- label = set widget label which will be display in widget list.
- description = set widget description.
- parameters = It will add different fields like text, textarea, select, multiselect etc.
2) Now, create PageWidget.php block at app/code/RH/Helloworld/Block/Widget/ and paste to below code for the call widget file and call widget’s functions.
[dm_code_snippet background=”no” background-mobile=”no” slim=”no” line-numbers=”no” bg-color=”#fff” theme=”dark” language=”php” wrapped=”no” height=”” copy-text=”Copy Code” copy-confirmed=”Copied”]
<?php
/**
 * Created By : Rohan Hapani
 */
namespace RH\Helloworld\Block\Widget;

use Magento\Framework\View\Element\Template;
use Magento\Widget\Block\BlockInterface;

class PageWidget extends Template implements BlockInterface
{
   protected $_template = "RH_Helloworld::widget/page_widget.phtml";
}
[/dm_code_snippet]
3) Then, Create TextAreaField.php file at app/code/RH/Helloworld/Block/Adminhtml/Widget/ and paste the below code to add textarea field :
[dm_code_snippet background=”no” background-mobile=”no” slim=”no” line-numbers=”no” bg-color=”#fff” theme=”dark” language=”php” wrapped=”no” height=”” copy-text=”Copy Code” copy-confirmed=”Copied”]
<?php
/**
 * Created By : Rohan Hapani
 */
namespace RH\Helloworld\Block\Adminhtml\Widget;

use Magento\Framework\Data\Form\Element\AbstractElement;

class TextAreaField extends \Magento\Backend\Block\Template
{
    /**
     * @var \Magento\Framework\Data\Form\Element\Factory
     */
    protected $elementFactory;

    /**
     * @param \Magento\Backend\Block\Template\Context $context
     * @param \Magento\Framework\Data\Form\Element\Factory $elementFactory
     * @param array $data
     */
    public function __construct(
        \Magento\Backend\Block\Template\Context $context,
        \Magento\Framework\Data\Form\Element\Factory $elementFactory,
        array $data = []
    ) {
        $this->elementFactory = $elementFactory;
        parent::__construct($context, $data);
    }
    /**
     * Prepare chooser element HTML
     *
     * @param \Magento\Framework\Data\Form\Element\AbstractElement $element Form Element
     * @return \Magento\Framework\Data\Form\Element\AbstractElement
     */
    public function prepareElementHtml(AbstractElement $element)
    {
        $input = $this->elementFactory->create("textarea", ['data' => $element->getData()]);
        $input->setId($element->getId());
        $input->setForm($element->getForm());
        $input->setClass("widget-option input-textarea admin__control-text");
        if ($element->getRequired()) {
            $input->addClass('required-entry');
        }

        $element->setData('after_element_html', $input->getElementHtml());
        return $element;
    }
}
[/dm_code_snippet]
4) In Last, Create page_widget.phtml file at app/code/RH/Helloworld/view/frontend/templates/widget/ and paste the below code for display widget data :
[dm_code_snippet background=”no” background-mobile=”no” slim=”no” line-numbers=”no” bg-color=”#fff” theme=”dark” language=”markup” wrapped=”no” height=”” copy-text=”Copy Code” copy-confirmed=”Copied”]
<div class="maincontent">
<div class="title">
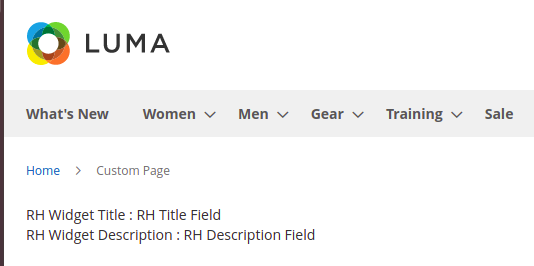
<span class="widget-title"><?php echo __("RH Widget Title : "); ?></span>
<span class="widget-title-val"><?php echo $block->getData('rh_title'); ?></span>
</div>
<div class="description">
<span class="widget-desc"><?php echo __("RH Widget Description : "); ?></span>
<span class="widget-desc-val"><?php echo $block->getData('rh_description'); ?></span>
</div>
</div>
[/dm_code_snippet]
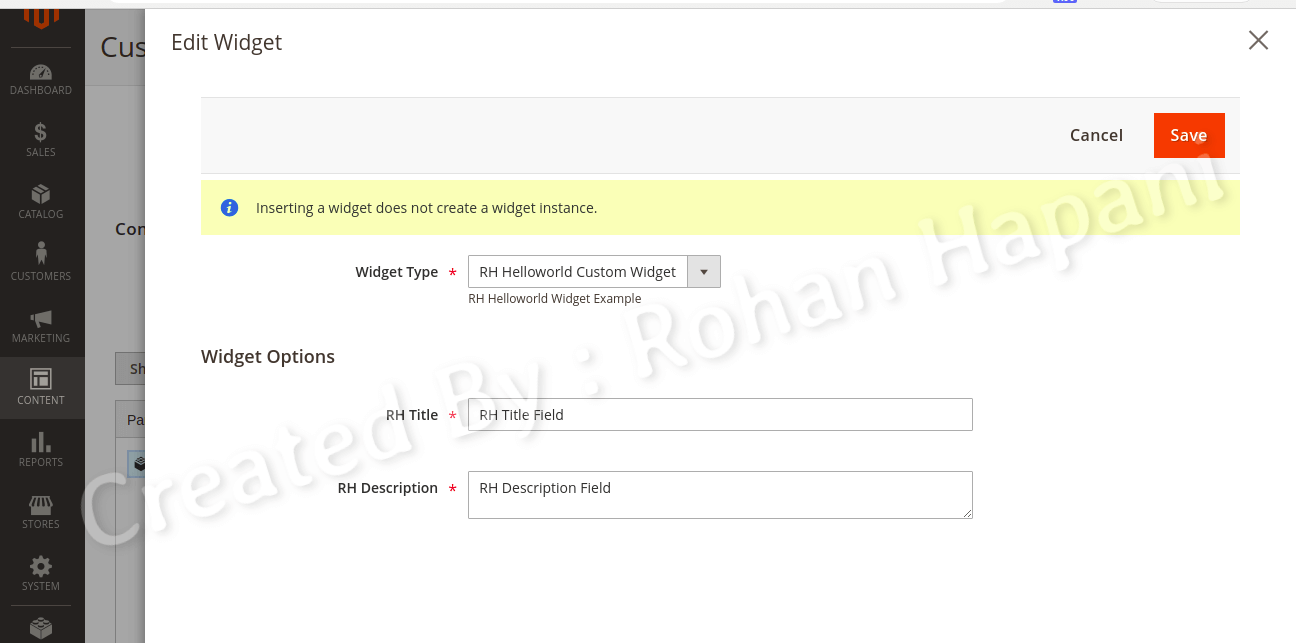
Now, you can fill up value in widget and call widget in cms page or block.
That’s it !!!
Admin output :
Front Output :
I hope this blog is easy to understand about how to create custom widget in Magento 2. In case, I missed anything or need to add some information, always feel free to leave a comment in this blog, I’ll get back with proper solution.
Stay Safe and Stay Connected !!