In this tutorial, Today I will explain to how to configure braintree payment method in Magento 2. Braintree is payment method which allows to customer check out by accessing debit and credit cards, PayPal, Apple Pay etc. It is very secure with PayPal integration.
In this days, online payment system has grown increasingly because of online shopping and internet banking. It’s also accept credit card online payment. During the checkout process, Customer can able to use credit cart such as Visa, Master Card, American Express etc.
You may also like this :
To set the Braintree Payment Method in your store, Let’s follow the below steps :
1) Braintree Payment Method Configuration :
- Go to Stores > Settings > Configuration > Sales > Payment Methods and expand Braintree Section and Click the Configure Button.
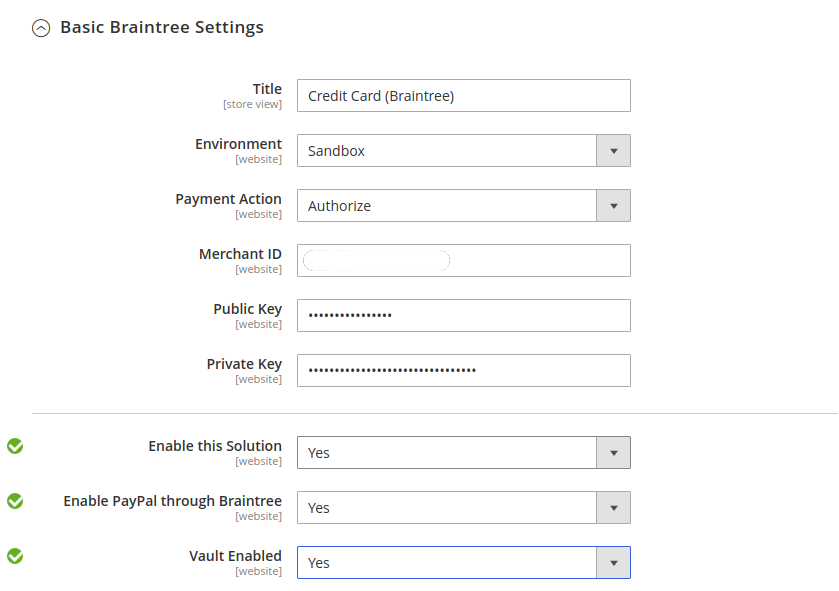
2) Set up details for Basic Braintree Settings :
- Title : You can set your custom title or set default title “Credit Card (Braintree)“.
- Environment : For test environment, set value “Sandbox” and for live, set value “Production“.
- Payment Action :
- Authorize : It approves the purchase and puts a hold on the funds for being captured by merchant. The amount will be withdrawn from customer’s bank account only after captured by the merchant.
- Authorize and Capture : It indicates that the amount of the purchase is authorized and withdrawn from the customer’s account at once.
- Merchant ID : Add the Merchant ID from your Braintree Account.
- Public Key and Private Key : Add the Keys from your Braintree Account.
- Enable this Solution : Set value “Yes” to activate Braintree Payment Method.
- Enable PayPal through Braintree : Set value “Yes” to include PayPal as Payment Option with Braintree Payment Method.
- Vault Enabled : Set value “Yes” to store customer information securely and give facility to not enter information everytime when purchase product and pay for that.
3) Set up details for Advance Braintree Settings :
- Vault Title : You can set your custom title or set default title “Stored Cards (Braintree)“.
- Merchant Account ID : Add the Merchant ID from your Braintree Account.
- Advanced Fraud Protection : Set value “Yes” for use Braintree fraud protection for all transactions
- Debug : Set value “Yes” to save a log file of interactions between your store and Braintree.
- CVV Verification : Set value “Yes” for require customers to provide the 3 digit security code of Credit Card.
- Credit Card Types : Add Credit Card list which you want to allow for your store.
- Sort Order : Position of display Braintree Method at frontend side.
4) Set up details for Country Specific Settings :
- Payment from Applicable Countries :
- All Allowed Countries : Accept Braintree methods for all customers from all countries which specified in your store configuration.
- Specific Countries : Accept Braintree methods for specific countries.
- Payment from Specific Countries : Select specific countries to allow to use Braintree methods.
- Country Specific Credit Card Types : For that, click on Add button, select the Country and choose allow Credit Card types.
5) Set up details for PayPal through Braintree :
- Title : You can set your custom title or set default title “PayPal (Braintree)” to display Braintree’s payment by PayPal on the checkout page.
- Vault Enabled : Set value “Yes” to store customer information securely and give facility to not enter information everytime when purchase product and pay for that.
- Sort Order : Position of display Braintree Method at frontend side.
- Override Merchant Name : Set value to display different merchant name.
- Payment Action :
- Authorize : It approves the purchase and puts a hold on the funds for being captured by merchant. The amount will be withdrawn from customer’s bank account only after captured by the merchant.
- Authorize and Capture : It indicates that the amount of the purchase is authorized and withdrawn from the customer’s account at once.
- Payment from Applicable Countries :
- All Allowed Countries : Accept Braintree methods for all customers from all countries which specified in your store configuration.
- Specific Countries : Accept Braintree methods for specific countries.
- Payment from Specific Countries : Select specific countries to allow to use Braintree methods.
- Require Customer’s Billing Address : Set “Yes” to require customer’s billing address.
- Allow to Edit Shipping Address Entered During Checkout on PayPal Side : Set “Yes” to enable customers to edit shipping address during PayPal transaction.
- Debug : Set value “Yes” to save a log file of interactions between your store and PayPal throw Braintree.
- Display on Shopping Cart : Set value “Yes” to display PayPal Button in mini cart and shopping cart page.
- Skip Order Review : Set value “Yes” to bypass order review step before order is submitted.
6) Set up details for 3D Secure Verification Settings :
- 3D Secure Verification : Set value “Yes” to to add a verification step for customers using credit cards that are enrolled in a verification program such as Verified by VISA.
- Threshold Amount : Enter the minimum order amount that is required to trigger 3D verification.
- Verify for Applicable Countries : Set value to allow for all countries or for specific countries.
- Verify for Specific Countries : Select specific countries to allow 3D secure verification.
In conclusion, These all six steps here explained with details. Now, you can setup braintree payment methods using above details. You can also see here other payment steps configured. For example, Advance Braintree Settings, Country Specific Settings, PayPal throw Settings etc.
So, Finally your Braintree Payment Method configured successfully.
I hope this blog is easy to understand about how to configure braintree payment method in Magento 2. In case, I missed anything or need to add some information, always feel free to leave a comment in this blog, I’ll get back with proper solution.
Keep liking and sharing 🙂