In this tutorial, Today I will explain to how to create CMS page using data patch in Magento 2. After Magento 2.3.x, Magento has introduced Data Patch Interface functionality. Using that, we can add/update data. Before Magento 2.3.x, we used InstallData or UpgradeData file to Create CMS Page. But, After Magento 2.3.x we need to use data patch functionality.
So, Let’s see about steps for create cms page programmatically using data patch.
You may also like this :
- Magento 2 : Create a Product Attribute using Data Patches
- Magento 2 : Get CMS Page Collection by Identifier
Steps of Create CMS Page using Data Patch in Magento 2 :
1) Let’s assume that you have created simple module for that. Now, To Create Custom CMS page you need to create CustCmsCreate.php file at app/code/RH/Helloworld/Setup/Patch/Data/ and paste the below code :
[dm_code_snippet background=”no” background-mobile=”no” slim=”no” line-numbers=”no” bg-color=”#fff” theme=”dark” language=”php” wrapped=”no” height=”” copy-text=”Copy Code” copy-confirmed=”Copied”]
<?php
/**
 * Copyright © Magento, Inc. All rights reserved.
 * See COPYING.txt for license details.
 */

/**
 * Created By : Rohan Hapani
 */
declare (strict_types = 1);

namespace RH\Helloworld\Setup\Patch\Data;

use Magento\Cms\Model\PageFactory;
use Magento\Framework\Setup\ModuleDataSetupInterface;
use Magento\Framework\Setup\Patch\DataPatchInterface;

class CustCmsCreate implements DataPatchInterface
{
    /**
     * ModuleDataSetupInterface
     *
     * @var ModuleDataSetupInterface
     */
    private $moduleDataSetup;

    /**
     * @var PageFactory
     */
    private $pageFactory;

    /**
     * @param ModuleDataSetupInterface $moduleDataSetup
     * @param PageFactory $pageFactory
     */
    public function __construct(
        ModuleDataSetupInterface $moduleDataSetup,
        PageFactory $pageFactory
    ) {
        $this->moduleDataSetup = $moduleDataSetup;
        $this->pageFactory = $pageFactory;
    }

    /**
     * {@inheritdoc}
     */
    public function apply()
    {

        $pageData = [
            'title' => 'Rohan Custom CMS Page', // cms page title
            'page_layout' => '1column', // cms page layout
            'meta_keywords' => 'RH Cms Meta Keywords', // cms page meta keywords
            'meta_description' => 'RH Cms Meta Description', // cms page meta description
            'identifier' => 'rhcms', // cms page identifier
            'content_heading' => 'Rohan Custom CMS Page', // cms page content heading
            'content' => '<h1>RH Custom Cms Page Content</h1>', // cms page content
            'layout_update_xml' => '', // cms page layout xml
            'url_key' => 'rhcms', // cms page url key
            'is_active' => 1, // status enabled or disabled
            'stores' => [0, 1], // You can set store id single or multiple values in array.
            'sort_order' => 0, // cms page sort order
        ];

        $this->moduleDataSetup->startSetup();
        $this->pageFactory->create()->setData($pageData)->save();
        $this->moduleDataSetup->endSetup();
    }

    /**
     * {@inheritdoc}
     */
    public static function getDependencies()
    {
        return [];
    }

    /**
     * {@inheritdoc}
     */
    public function getAliases()
    {
        return [];
    }
}
[/dm_code_snippet]
Here, you can set title, page layout, meta keywords, meta description, identifier, content, url_key of cms page in apply() function. You can set up multiple store ids as array to create cms page in multiple stores.
2) In Last, Now just execute this below command :
[dm_code_snippet background=”no” background-mobile=”no” slim=”no” line-numbers=”no” bg-color=”#fff” theme=”dark” language=”shell” wrapped=”no” height=”” copy-text=”Copy Code” copy-confirmed=”Copied”]
php bin/magento s:up
php bin/magento s:s:d -f
php bin/magento c:c
[/dm_code_snippet]
That’s it !!!
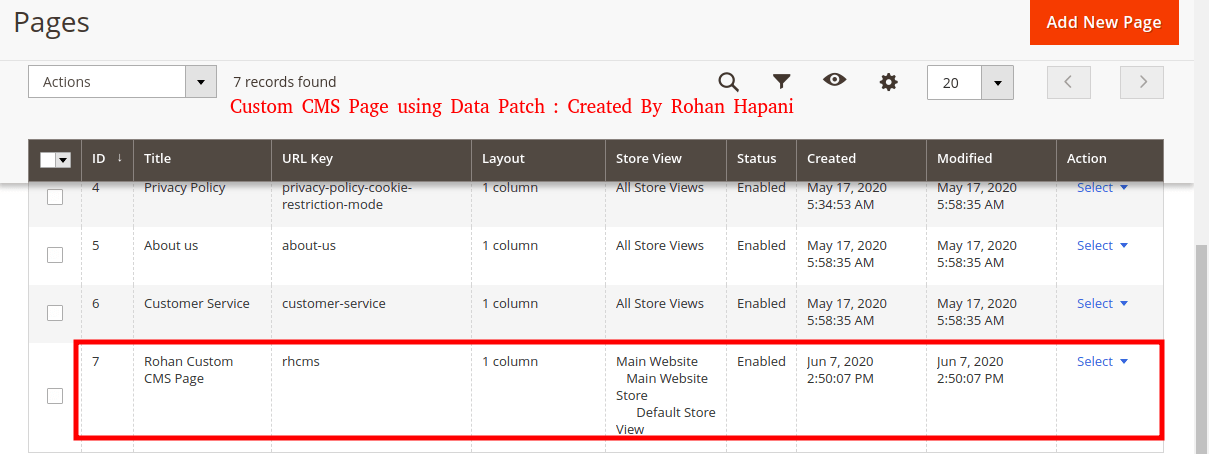
Now, You can see custom CMS page will create successfully.
Output :
I hope this blog is easy to understand about how to create CMS page using data patch in Magento 2. In case, I missed anything or need to add some information, always feel free to leave a comment in this blog, I’ll get back with proper solution.
Stay Safe and Stay Connected !!