In this tutorial, Today I will explain to how to use inline edit in UI Grid in Magento 2. In some UI Grids, Magento 2 provides functionality of inline edit data directly from UI Grid. But, if you want to add inline edit feature in your custom module then, how to do that? So, Let’s check the below steps for that :
You may also like this :
- Magento 2 : How to Add Product Grid in UI Form using UIComponent
- Add Category Filter to Product Grid in Magento 2 Admin
Steps of use inline edit in UI Grid :
1) First of all, You need to create UI Component Grid. Then, In the element of column add this below code of your UI grid listing file :
[dm_code_snippet background=”no” background-mobile=”no” slim=”no” line-numbers=”no” bg-color=”#fff” theme=”dark” language=”markup” wrapped=”no” height=”” copy-text=”Copy Code” copy-confirmed=”Copied”]
<item name="editorConfig" xsi:type="array">
    <item name="selectProvider" xsi:type="string">rh_uiexample_blog_listing.rh_uiexample_blog_listing.uiexample_blog_columns.ids</item>
    <item name="enabled" xsi:type="boolean">true</item>
    <item name="indexField" xsi:type="string">entity_id</item>
    <item name="clientConfig" xsi:type="array">
        <item name="saveUrl" xsi:type="url" path="rh_uiexample/blog/inlineEdit"/>
        <item name="validateBeforeSave" xsi:type="boolean">false</item>
    </item>
</item>
[/dm_code_snippet]
In above code, you need to set action URL in path attribute. I added rh_uigridexample/entity/inlineEdit as my action URL.
2) After that, To make a clickable grid, add this below code after that editorConfig element(above code) in your UI Grid listing file :
[dm_code_snippet background=”no” background-mobile=”no” slim=”no” line-numbers=”no” bg-color=”#fff” theme=”dark” language=”markup” wrapped=”no” height=”” copy-text=”Copy Code” copy-confirmed=”Copied”]
<item name="childDefaults" xsi:type="array">
    <item name="fieldAction" xsi:type="array">
        <item name="provider" xsi:type="string">rh_uiexample_blog_listing.rh_uiexample_blog_listing.uiexample_blog_columns_editor</item>
        <item name="target" xsi:type="string">startEdit</item>
        <item name="params" xsi:type="array">
            <item name="0" xsi:type="string">${ $.$data.rowIndex }</item>
            <item name="1" xsi:type="boolean">true</item>
        </item>
    </item>
    <item name="storageConfig" xsi:type="array">
        <item name="provider" xsi:type="string">rh_uiexample_blog_listing.rh_uiexample_blog_listing.listing_top.bookmarks</item>
        <item name="root" xsi:type="string">columns.${ $.index }</item>
        <item name="namespace" xsi:type="string">current.${ $.storageConfig.root }</item>
    </item>
</item>
[/dm_code_snippet]
3) Then, To make a column editable in your UI Grid, add this below code in your column code in your UI Grid listing file :
[dm_code_snippet background=”no” background-mobile=”no” slim=”no” line-numbers=”no” bg-color=”#fff” theme=”dark” language=”markup” wrapped=”no” height=”” copy-text=”Copy Code” copy-confirmed=”Copied”]
<column name="attribute_name">
    <argument name="data" xsi:type="array">
        <item name="config" xsi:type="array">
            <item name="editor" xsi:type="array">
                <item name="editorType" xsi:type="string">text</item>
                <item name="validation" xsi:type="array">
                    <item name="required-entry" xsi:type="boolean">true</item>
                </item>
            </item>
            <item name="filter" xsi:type="string">text</item>
            <item name="label" xsi:type="string" translate="true">Name</item>
            <item name="sortOrder" xsi:type="number">10</item>
        </item>
    </argument>
</column>
[/dm_code_snippet]
In above code, editorType is used for add type of input editor such as text, date, etc.
4) In Last, Create controller action at app/code/RH/UiExample/Controller/Adminhtml/Blog/InlineEdit.php file and paste the below code to save data :
[dm_code_snippet background=”no” background-mobile=”no” slim=”no” line-numbers=”no” bg-color=”#fff” theme=”dark” language=”php” wrapped=”no” height=”” copy-text=”Copy Code” copy-confirmed=”Copied”]
<?php
/**
 * Created By : Rohan Hapani
 */
namespace RH\UiExample\Controller\Adminhtml\Blog;

use Magento\Backend\App\Action;
use Magento\Backend\App\Action\Context;
use Magento\Framework\Controller\Result\JsonFactory;
use RH\UiExample\Model\ResourceModel\Blog\Collection;

class InlineEdit extends Action
{

    /**
     * @var JsonFactory
     */
    protected $jsonFactory;

    /**
     * @var Collection
     */
    protected $blogCollection;

    /**
     * @param Context     $context
     * @param Collection  $blogCollection
     * @param JsonFactory $jsonFactory
     */
    public function __construct(
        Context $context,
        Collection $blogCollection,
        JsonFactory $jsonFactory
    ) {
        parent::__construct($context);
        $this->jsonFactory = $jsonFactory;
        $this->blogCollection = $blogCollection;
    }

    /**
     * @return \Magento\Framework\Controller\ResultInterface
     */
    public function execute()
    {
        /**
         * @var \Magento\Framework\Controller\Result\Json $resultJson
         */
        $resultJson = $this->jsonFactory->create();
        $error = false;
        $messages = [];

        $postData = $this->getRequest()->getParam('items', []);
        if (!($this->getRequest()->getParam('isAjax') && count($postData))) {
            return $resultJson->setData(
                [
                    'messages' => [__('Please correct the data which you send.')],
                    'error' => true,
                ]
            );
        }

        try {
            $this->blogCollection
                ->setStoreId($this->getRequest()->getParam('store', 0))
                ->addFieldToFilter('entity_id', ['in' => array_keys($postData)])
                ->walk('saveCollection', [$postData]);
        } catch (\Exception $e) {
            $messages[] = __('There was an error saving the data: ') . $e->getMessage();
            $error = true;
        }

        return $resultJson->setData(
            [
                'messages' => $messages,
                'error' => $error,
            ]
        );
    }
}
[/dm_code_snippet]
You can customize code of action based on your requirement.
Now, Just clean cache and check it.
That’s it !!!
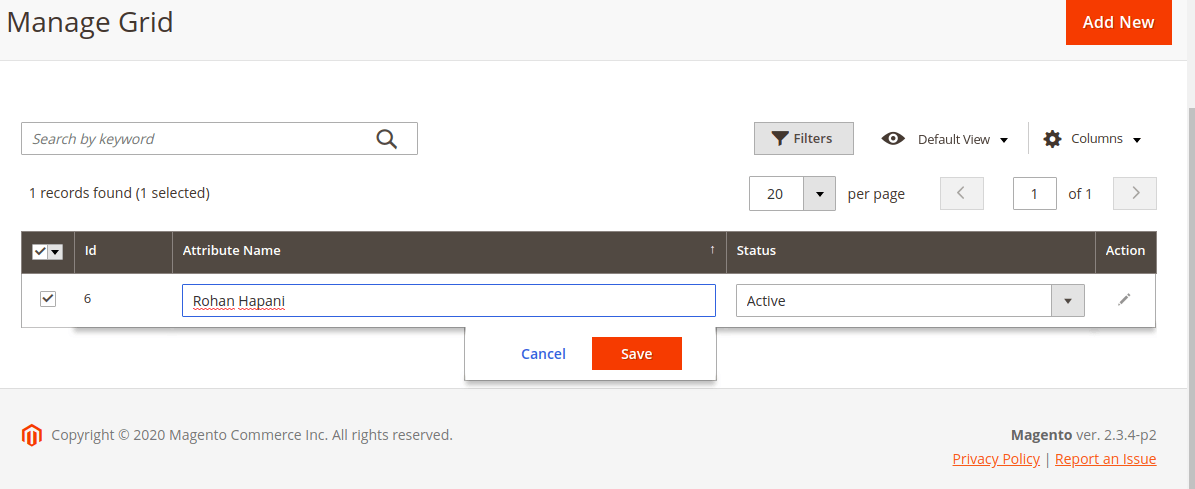
Output :
I hope this blog is easy to understand about how to use inline edit in UI Grid in Magento 2. In case, I missed anything or need to add some information, always feel free to leave a comment in this blog, I’ll get back with proper solution.
Stay Safe and Stay Connected !!