In this tutorial, Today I will explain to how to create a category attribute using data patches in Magento 2. Magento added new features which is data patches after Magento 2.3.x.
Previously, Magento 2 uses InstallData and UpgradeData file use add data in core table or custom table. From Magento 2.3 it will be replaced by Data Patch.
How to Add Data Patch in Magento 2.3 :
It’s defined in <Vendor_Name>/<Module_Name>/Setup/Patch/Data/<Patch_File_Name>.php and it will implement \Magento\Setup\Model\Patch\DataPatchInterface interface.
So, Let’s follow the steps :
You may also like this :
- Magento 2 : Create a Product Attribute using Data Patches
- Magento 2.3 : Rename a Table using Declarative Schema
Steps of how to create category attribute using data patch in Magento 2 :
1) First of all, Let’s assume that you have created simple module. Now, To create custom category attribute Create CategoryAttribute.php file at app/code/RH/Helloworld/Setup/Patch/Data/ and paste the below code :
[dm_code_snippet background=”no” background-mobile=”no” slim=”no” line-numbers=”no” bg-color=”#fff” theme=”dark” language=”php” wrapped=”no” height=”” copy-text=”Copy Code” copy-confirmed=”Copied”]
<?php
/**
 * Copyright © Magento, Inc. All rights reserved.
 * See COPYING.txt for license details.
 */

/**
 * Created By : Rohan Hapani
 */
declare (strict_types = 1);

namespace RH\Helloworld\Setup\Patch\Data;

use Magento\Eav\Model\Entity\Attribute\ScopedAttributeInterface;
use Magento\Eav\Setup\EavSetup;
use Magento\Eav\Setup\EavSetupFactory;
use Magento\Framework\Setup\ModuleDataSetupInterface;
use Magento\Framework\Setup\Patch\DataPatchInterface;
use Magento\Catalog\Model\Category;

/**
 * Class CategoryAttribute for Create Custom Category Attribute using Data Patch.
 */
class CategoryAttribute implements DataPatchInterface {

    /**
     * ModuleDataSetupInterface
     *
     * @var ModuleDataSetupInterface
     */
    private $moduleDataSetup;

    /**
     * EavSetupFactory
     *
     * @var EavSetupFactory
     */
    private $eavSetupFactory;

    /**
     * @param ModuleDataSetupInterface $moduleDataSetup
     * @param EavSetupFactory          $eavSetupFactory
     */
    public function __construct(
        ModuleDataSetupInterface $moduleDataSetup,
        EavSetupFactory $eavSetupFactory
    ) {
        $this->moduleDataSetup = $moduleDataSetup;
        $this->eavSetupFactory = $eavSetupFactory;
    }

    /**
     * {@inheritdoc}
     */
    public function apply() {
        /** @var EavSetup $eavSetup */
        $eavSetup = $this->eavSetupFactory->create(['setup' => $this->moduleDataSetup]);

        $eavSetup->addAttribute(Category::ENTITY, 'rh_cat_attr', [
            'type' => 'text',
            'label' => 'RH Custom Category Attribute',
            'input' => 'text',
            'default' => 0,
            'sort_order' => 5,
            'global' => ScopedAttributeInterface::SCOPE_STORE,
            'group' => 'General Information',
            'visible_on_front' => true
        ]);
    }

    /**
     * {@inheritdoc}
     */
    public static function getDependencies() {
        return [];
    }

    /**
     * {@inheritdoc}
     */
    public function getAliases() {
        return [];
    }
}
[/dm_code_snippet]
2) Now, To add attribute in category form, you need to create category_form.xml at app/code/RH/Helloworld/view/adminhtml/ui_component/ and paste the below code :
[dm_code_snippet background=”no” background-mobile=”no” slim=”no” line-numbers=”no” bg-color=”#fff” theme=”dark” language=”markup” wrapped=”no” height=”” copy-text=”Copy Code” copy-confirmed=”Copied”]
<?xml version="1.0" ?>
<!--
/**
 * Created By : Rohan Hapani
 */
-->
<form xmlns:xsi="http://www.w3.org/2001/XMLSchema-instance"
    xsi:noNamespaceSchemaLocation="urn:magento:module:Magento_Ui:etc/ui_configuration.xsd">
    <fieldset name="general">
        <field name="rh_cat_attr">
            <argument name="data" xsi:type="array">
                <item name="config" xsi:type="array">
                    <item name="required" xsi:type="boolean">false</item>
                    <item name="validation" xsi:type="array">
                        <item name="required-entry" xsi:type="boolean">false</item>
                    </item>
                    <item name="sortOrder" xsi:type="number">100</item>
                    <item name="dataType" xsi:type="string">string</item>
                    <item name="formElement" xsi:type="string">input</item>
                    <item name="label" translate="true" xsi:type="string">RH Custom Category Attribute</item>
                </item>
            </argument>
        </field>
    </fieldset>
</form>
[/dm_code_snippet]
Here, In this above file there are some new functions available in that file code. So, Let’s understand short details about the use of that functions.
First of all, apply() function is used to implement code logic to installing or upgrading data to the database. For ex, here you can see that there are create product attribute code logic added inside apply() function.
After that, getAliases() function defines aliases for the patch class. Sometimes, When you want to change the class name then it could possible using getAliases() function. If it does, then we should add old class name so, it’s not executed a second time.
In Last, getVersion() function will return a version of the patch. If the version of the module will be high than the version we specify in our patch, then it will not get executed. It will executed only when it’s equal to or lower than the version here.
3) In Last, Now just execute this below command :
[dm_code_snippet background=”no” background-mobile=”no” slim=”no” line-numbers=”no” bg-color=”#fff” theme=”dark” language=”shell” wrapped=”no” height=”” copy-text=”Copy Code” copy-confirmed=”Copied”]
php bin/magento s:up
php bin/magento s:s:d -f
php bin/magento c:c
[/dm_code_snippet]
That’s it !!
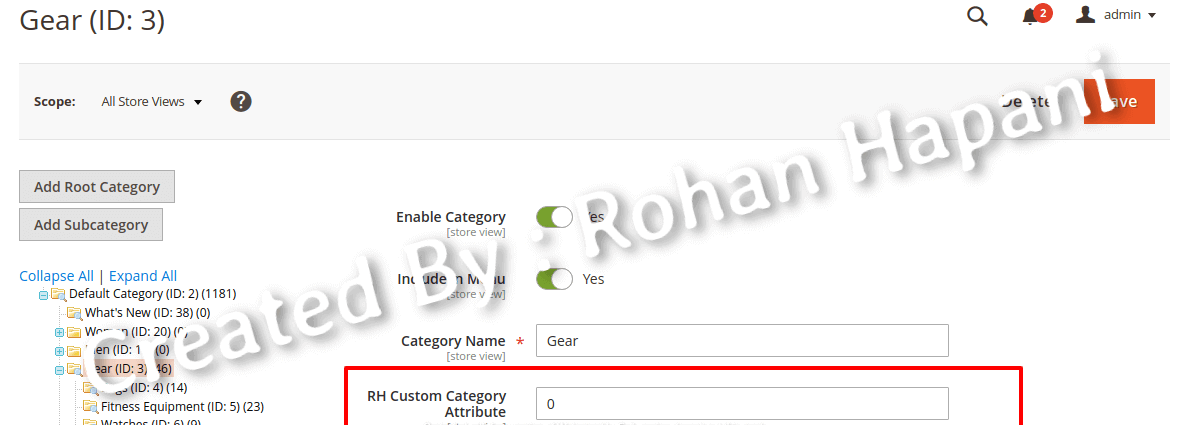
Now, you can see in eav_attribute table that your custom category attribute created successfully using data patch.
I hope this blog is easy to understand about how to create a category attribute using data patches in Magento 2. In case, I missed anything or need to add some information, always feel free to leave a comment in this blog, I’ll get back with proper solution.
Keep liking and sharing !!