In this tutorial, Today I will explain to how to page speed optimization of your Magento 2 website. Magento 2 speed optimization is the most important step when you want to increase traffic to your store. Sometimes, when the little bit store’s speed is lower then, the store owner will lose many orders because of low site speed. So, It’s important that the site speed up of your website is the first impression.
You may also like this :
- How to Check Elasticsearch is Enabled Programmatically in Magento 2
- How to Install Magento 2.4 using Command Line
Let’s follow some steps to optimize your Magento 2 website and speed up your website :
Note: Before applying these changes, take a backup of your codes and database.
Now, there are some points helpful inside the coding structure you need to follow for page speed optimization. So, Let’s see those steps
Steps of coding standard to Magento 2 page speed optimization :
1) First of all, Use the always collection class to fetch collection.
How to get collection (Use this) :
[dm_code_snippet background=”no” background-mobile=”no” slim=”no” line-numbers=”no” bg-color=”#fff” theme=”dark” language=”php” wrapped=”no” height=”” copy-text=”Copy Code” copy-confirmed=”Copied”]
protected $productFactory;

public function __construct(
    \Magento\Catalog\Model\ProductFactory $productFactory
){
    $this->productFactory = $productFactory;
}

public function getProductCollection()
{
    $productCollection = $this->productFactory->create()->getCollection();
    return $productCollection;
}
[/dm_code_snippet]
How to get a collection (Avoid to use this) :
[dm_code_snippet background=”no” background-mobile=”no” slim=”no” line-numbers=”no” bg-color=”#fff” theme=”dark” language=”php” wrapped=”no” height=”” copy-text=”Copy Code” copy-confirmed=”Copied”]
protected $collectionFactory;

publi function __construct(
    \Magento\Catalog\Model\ResourceModel\Product\CollectionFactory $collectionFactory
){
    $this->collectionFactory = $collectionFactory;
}

public function getProductCollection()
{
    $productCollection = $this->collectionFactory->create();
    return $productCollection;
}
[/dm_code_snippet]
2) Then, use setPageSize() to display limited records from this collection
How to display limited records from the collection (Use this) :
[dm_code_snippet background=”no” background-mobile=”no” slim=”no” line-numbers=”no” bg-color=”#fff” theme=”dark” language=”php” wrapped=”no” height=”” copy-text=”Copy Code” copy-confirmed=”Copied”]
$collection->setPageSize(2);
[/dm_code_snippet]
How to display limited records from the collection (Avoid to use this) :
[dm_code_snippet background=”no” background-mobile=”no” slim=”no” line-numbers=”no” bg-color=”#fff” theme=”dark” language=”php” wrapped=”no” height=”” copy-text=”Copy Code” copy-confirmed=”Copied”]
$collection->getSelect()->limit(2);
[/dm_code_snippet]
3) After that, avoid to use join collection to fetch data from multiple tables
(Use this) :
Add that appropriate field in your table and after fetch records.
(Avoid to use this) :
[dm_code_snippet background=”no” background-mobile=”no” slim=”no” line-numbers=”no” bg-color=”#fff” theme=”dark” language=”php” wrapped=”no” height=”” copy-text=”Copy Code” copy-confirmed=”Copied”]
$collection->getSelect()->joinLeft(
    ['t2' => self::CATALOG_PRODUCT_ENTITY],
    'e.entity_id = t2.productreview_id',
    't2.product_id'
);
$collection->getSelect()->joinLeft(
    ['pv' => self::CATEGORY_PRODUCT_ENTITY_VARCHAR],
    't2.product_id = pv.entity_id and pv.attribute_id = ' . self::PRODUCT_NAME_ATTRIBUTE_ID,
    'substring_index(GROUP_CONCAT(DISTINCT pv.entity_id SEPARATOR \',\'),\',\',4) as pid'
);
[/dm_code_snippet]
4) Then, use getSize() and count() for check empty or not / collection size :
(Use this) :
[dm_code_snippet background=”no” background-mobile=”no” slim=”no” line-numbers=”no” bg-color=”#fff” theme=”dark” language=”php” wrapped=”no” height=”” copy-text=”Copy Code” copy-confirmed=”Copied”]
if($collection->getSize() > 0) or if(count($collection) > 0)
{
    ........
}
[/dm_code_snippet]
(Avoid to use this) :
[dm_code_snippet background=”no” background-mobile=”no” slim=”no” line-numbers=”no” bg-color=”#fff” theme=”dark” language=”php” wrapped=”no” height=”” copy-text=”Copy Code” copy-confirmed=”Copied”]
// Return error when flat category configuration will be enabled.
if(empty($collection->getData()))
{
    ........
}
[/dm_code_snippet]
5) After that, Avoid add <script> tag in anywhere in php/phtml files. Always add <script> with defer parsing. For that, you can install the defer parsing module.
6) Then, Make sure that any page/action/images not return 404.
7) After that, Always set the height and width of the image. If you’ll display an image without height and width then, it will load with maximum dimensions based on that image size.
8) Always use the optimized images.
9) Never pass HTML content into your ajax response. Only pass text format data with JSON encode.
10) Make sure that on that page same images should not load from different file path locations.
- http://example.com/pub/media/default/images/oc1.png
- http://example.com/pub/media/wyswing/images/oc1.png
Both images are the same. But, load from a different location.
11) Then, Do not create hidden field to access value into your js file. Apply <script type=”text/x-magento-init”> structure and pass value into JS.
12) After that, When you use knockout js then, never add collection/array data in phtml file and pass into <script>. Always get collection/array using ajax when use knockout js. If you’ll pass a large collection from <script> then, it will increase page size from the original page size.
13) Never do clean cache programmatically if your collection do not load properly on the front page. For that, reset your collection or use the factory method.
[dm_code_snippet background=”no” background-mobile=”no” slim=”no” line-numbers=”no” bg-color=”#fff” theme=”dark” language=”php” wrapped=”no” height=”” copy-text=”Copy Code” copy-confirmed=”Copied”]
$this->collection->clear()->getSelect()->reset(\Zend_Db_Select::WHERE); // Reset collection
$this->collection->create(); // Factory method
[/dm_code_snippet]
14) In addition, Never use inline CSS and <style> tag in anywhere of PHP/phtml files. Always maintain the standard to create a common CSS file and add CSS with proper hierarchy.
15) If your jQuery code use on the whole page of the site. Then, do not add in different phtml files. Create a common js file which is used for the whole page of the site.
16) Don’t use Object Manager in any file.
If you need to get a custom collection in phtml without block. Then, follow the below points.
- Create block (if possible) and pass collection from the block.
- Create a helper file and call helper function in phtml file.
If you need to get a custom collection in controller/block. Then, use always the factory method.
17) After that, Always use add CSS from layout.xml file. Do not use @import(‘file name of CSS’) this way to add external CSS in the CSS file.
18) If any third party js load in your page. Then, set the order of loading that script.
19) If YouTube videos direct load on your page. Then, Add this below code in your <script>
[dm_code_snippet background=”no” background-mobile=”no” slim=”no” line-numbers=”no” bg-color=”#fff” theme=”dark” language=”javascript” wrapped=”no” height=”” copy-text=”Copy Code” copy-confirmed=”Copied”]
$(window).load(function() {
    var vidDefer = document.getElementsByTagName('iframe');
    for (var i = 0; i < vidDefer.length; i++) {
        if (vidDefer[i].getAttribute('data-src')) {
            vidDefer[i].setAttribute('src', vidDefer[i].getAttribute('data-src'));
        }
    }
});
[/dm_code_snippet]
It will set src of YouTube video after full page load. This single script will increase your page speed (If your page speeds down for this reason).
20) If possible, then do not create unnecessary <div> tags in your HTML files and make sure that your HTML tags open/close properly.
(Use this) :
[dm_code_snippet background=”no” background-mobile=”no” slim=”no” line-numbers=”no” bg-color=”#fff” theme=”dark” language=”markup” wrapped=”no” height=”” copy-text=”Copy Code” copy-confirmed=”Copied”]
<div id="reviews">
    ...
</div>
[/dm_code_snippet]
(Avoid to use this) :
[dm_code_snippet background=”no” background-mobile=”no” slim=”no” line-numbers=”no” bg-color=”#fff” theme=”dark” language=”markup” wrapped=”no” height=”” copy-text=”Copy Code” copy-confirmed=”Copied”]
<div id="reviews">
    <div>
        ....
    </div>
</div>
[/dm_code_snippet]
21) Do not load the collection inside for each loop. Set collection in a global variable and use that in whole files.
22) Set the datatype of the field as per the requirement of the field.
For example:
[dm_code_snippet background=”no” background-mobile=”no” slim=”no” line-numbers=”no” bg-color=”#fff” theme=”dark” language=”shell” wrapped=”no” height=”” copy-text=”Copy Code” copy-confirmed=”Copied”]
name datatype size
age  int      11 (Avoid to use)
age  smallint 5 (use)
[/dm_code_snippet]
Configuration Changes to Magento 2 page speed optimization :
1) Keep updated your store with the latest Magento 2 version
First of all, Always use the latest stable version of Magento 2.
2) Enable Flat Categories and Products
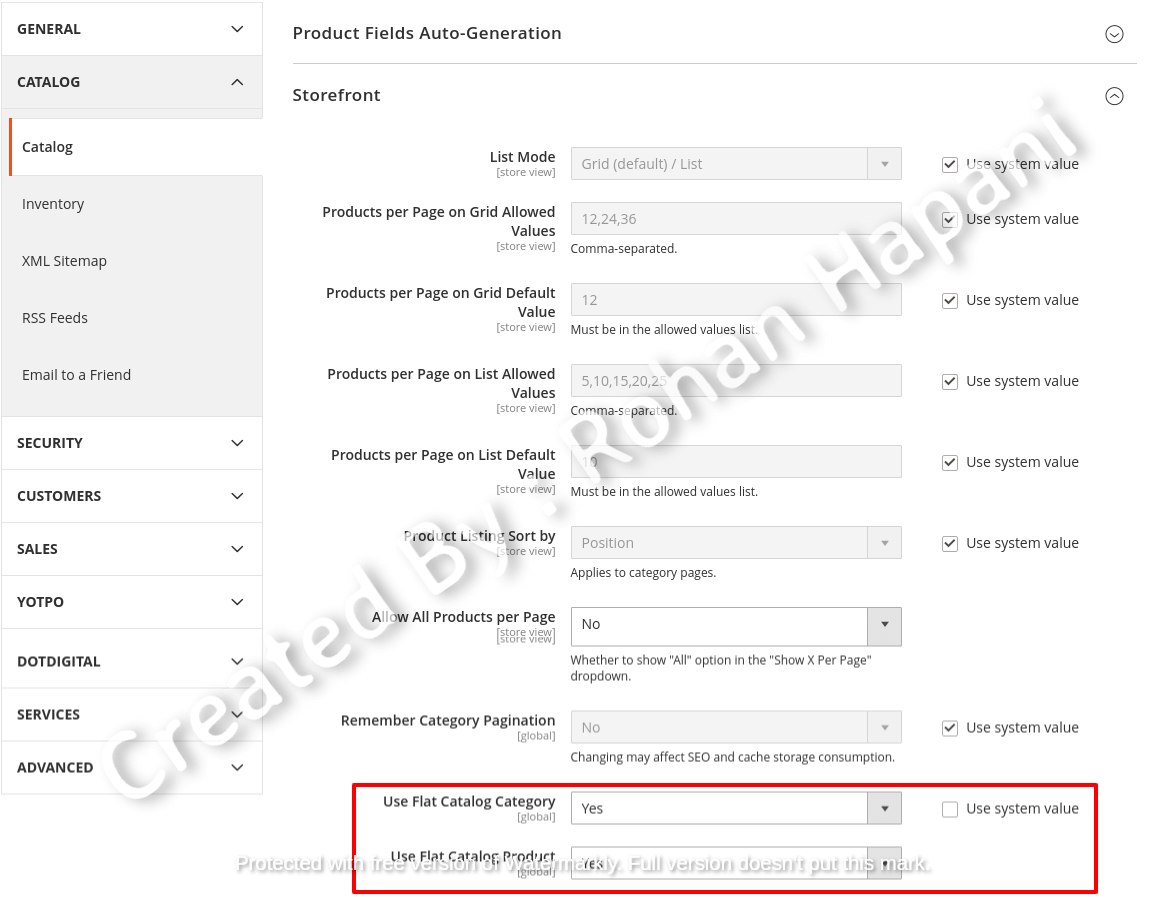
After that, To Make Categories and Product Page data read speed from DB, Enable Flat Categories and Products configuration using this below way
For Enable Flat Category
- Login to Admin -> Stores -> Configuration -> Catalog -> Catalog -> Storefront -> Use Flat Catalog Category -> Yes
For Enable Flat Product
- Login to Admin -> Stores -> Configuration -> Catalog -> Catalog -> Storefront -> Use Flat Catalog Product -> Yes (For Enable Flat Product)
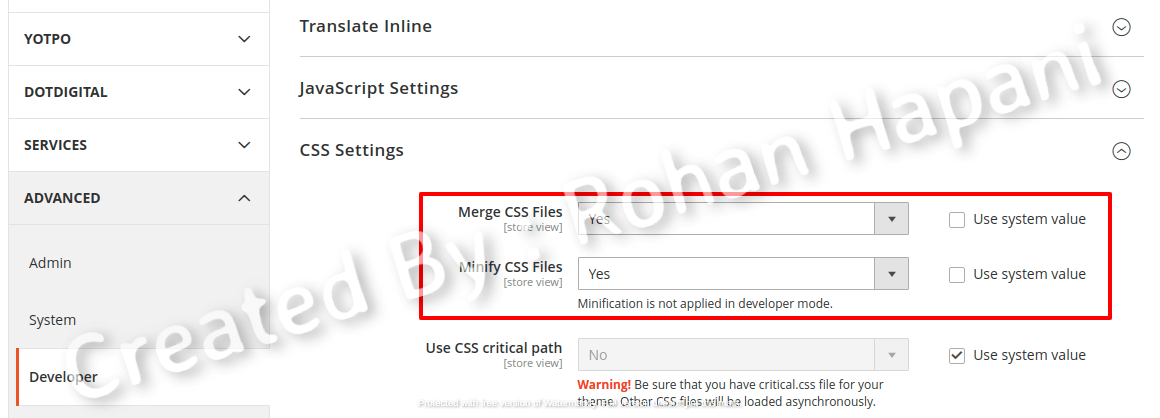
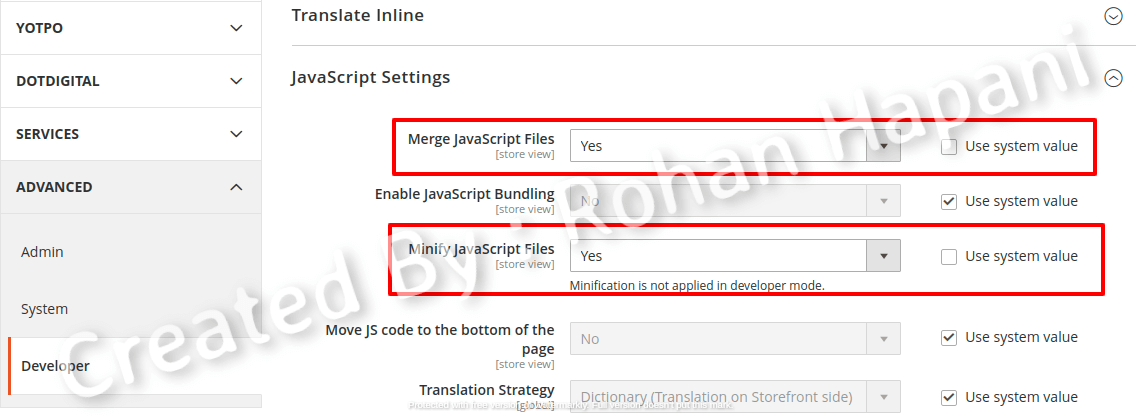
3) Merge & Minify CSS and JS Files
For, Merge & Minify CSS and JS files, Enable configuration using this below way
- Login to Admin -> Stores -> Configuration -> Advanced -> Developer -> CSS Settings -> Merge JavaScript Files -> Yes
- Login to Admin -> Stores -> Configuration -> Advanced -> Developer -> CSS Settings -> Minify JavaScript Files -> Yes
- Login to Admin -> Stores -> Configuration -> Advanced -> Developer -> JavaScript Settings -> Merge JavaScript Files -> Yes
- Login to Admin -> Stores -> Configuration -> Advanced -> Developer -> JavaScript Settings -> Minify JavaScript Files -> Yes
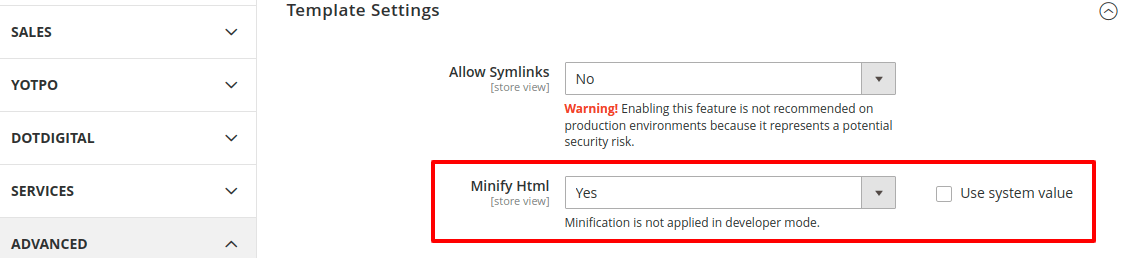
4) Minify Template Files :
For minify template files, Enable configuration using this below way
- Login to Admin -> Stores -> Configuration -> Advanced -> Developer -> Template Settings -> Minify Html -> Yes
5) Set up Content Delivery Network (CDN)
For Base URLs :
- Login to Admin -> Stores -> Configuration -> General -> Web -> Base URLs -> Enter the CDN URLs for the Static and JavaScript (User Media) Files in the Base URLs tab.
For Base URLs (Secure) :
- Login to Admin -> Stores -> Configuration -> General -> Web -> Base URLs (Secure) section -> Enter the same data in Secure Base URL for Static View Files and Secure Base URL for User Media Files fields.
6) Use Optimized Images
- Always use the optimized images in your Magento store.
- If you have Magento 2.4.x version, You can set up Fastly Image Optimization Configuration from here.
7) Apache Gzip Compression & Expire Modes
So, When you have an apache server, then you can enable gzip by adding this below code inside the .htacces file inside your Magento root folder
Note: Before applying these changes in your .htaccess file, take a backup of your .htaccess file.
[dm_code_snippet background=”no” background-mobile=”no” slim=”no” line-numbers=”no” bg-color=”#fff” theme=”dark” language=”shell” wrapped=”no” height=”” copy-text=”Copy Code” copy-confirmed=”Copied”]
<IfModule mod_expires.c>
  ExpiresActive On
  # Images
  ExpiresByType image/jpeg "access plus 1 year"
  ExpiresByType image/gif "access plus 1 year"
  ExpiresByType image/png "access plus 1 year"
  ExpiresByType image/webp "access plus 1 year"
  ExpiresByType image/svg+xml "access plus 1 year"
  ExpiresByType image/x-icon "access plus 1 year"
  # Video
  ExpiresByType video/mp4 "access plus 1 year"
  ExpiresByType video/mpeg "access plus 1 year"
  # CSS, JavaScript
  ExpiresByType text/css "access plus 1 month"
  ExpiresByType text/javascript "access plus 1 month"
  ExpiresByType application/javascript "access plus 1 month"
  # Others
  ExpiresByType application/pdf "access plus 1 month"
  ExpiresByType application/x-shockwave-flash "access plus 1 month"
</IfModule>

<IfModule mod_deflate.c>
    AddOutputFilterByType DEFLATE text/html
    AddOutputFilterByType DEFLATE text/css
    AddOutputFilterByType DEFLATE text/javascript
    AddOutputFilterByType DEFLATE text/xml
    AddOutputFilterByType DEFLATE text/plain
    AddOutputFilterByType DEFLATE image/x-icon
    AddOutputFilterByType DEFLATE image/svg+xml
    AddOutputFilterByType DEFLATE application/rss+xml
    AddOutputFilterByType DEFLATE application/javascript
    AddOutputFilterByType DEFLATE application/x-javascript
    AddOutputFilterByType DEFLATE application/xml
    AddOutputFilterByType DEFLATE application/xhtml+xml
    AddOutputFilterByType DEFLATE application/x-font
    AddOutputFilterByType DEFLATE application/x-font-truetype
    AddOutputFilterByType DEFLATE application/x-font-ttf
    AddOutputFilterByType DEFLATE application/x-font-otf
    AddOutputFilterByType DEFLATE application/x-font-opentype
    AddOutputFilterByType DEFLATE application/vnd.ms-fontobject
    AddOutputFilterByType DEFLATE font/ttf
    AddOutputFilterByType DEFLATE font/otf
    AddOutputFilterByType DEFLATE font/opentype
</IfModule>

<ifModule mod_gzip.c>
mod_gzip_on Yes
mod_gzip_dechunk Yes
mod_gzip_item_include file \.(html?|txt|css|js|php|pl)$
mod_gzip_item_include mime ^application/x-javascript.*
mod_gzip_item_include mime ^text/.*
mod_gzip_item_exclude rspheader ^Content-Encoding:.*gzip.*
mod_gzip_item_exclude mime ^image/.*
mod_gzip_item_include handler ^cgi-script$
</ifModule>
[/dm_code_snippet]
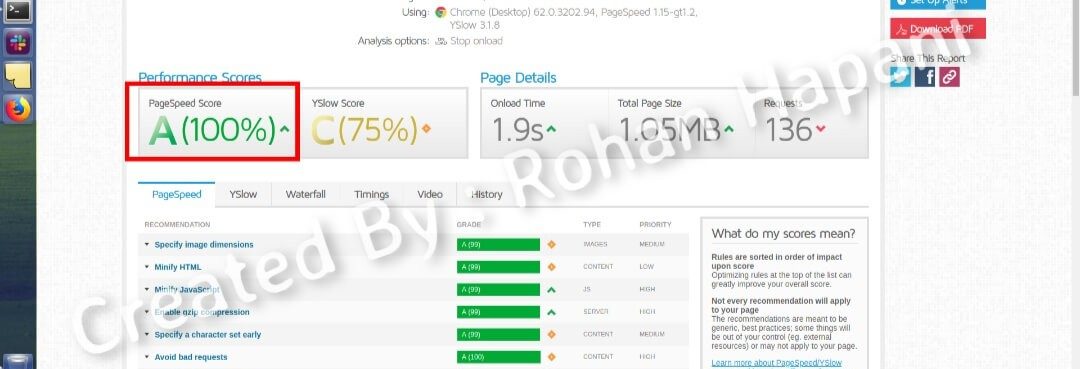
In Last, I have observed all these changes through the Mirasvit profiler module. Before, apply these changes the site speed score was 29% page score speed result in GTMetrix. Then, I follow up on all points and I achieved a 100% page score speed result in GTMetrix.
That’s it !!!
Result (After apply these changes) :
Bookmark this blog and keep sharing for page speed to optimize your store.
I hope this blog is easy to understand how to page speed optimization of your Magento 2 website. In case, I missed anything or need to add some information, always feel free to leave a comment in this blog, I’ll get back with a proper solution.
Stay Safe and Stay Connected !!